Labs
- L01 - Visual Studio Code (VS Code) Lab
- L02 - Soda Can Lab
- L03 - Coupons
- L04 - Iteration Lab - Part 1 - The Three Loops
- L04 - Iteration Lab - Part 2 - Nested For Loops
- L05 - Using Arrays
- L06 - Bank Account Lab
- L07 - Shapes Lab
- L08 - Autopilot Interface Lab
- L09 - ReverseIt Lab
- L10 - Runtime Exceptions Lab
- L11 - Designing Exception Types Lab
- L12 - Recursion Exercise
- L13 - Finite State Machines
L01 - Visual Studio Code (VS Code) Lab
- Install Visual Studio Code from FIRST, you will need their version with WPILib. Link
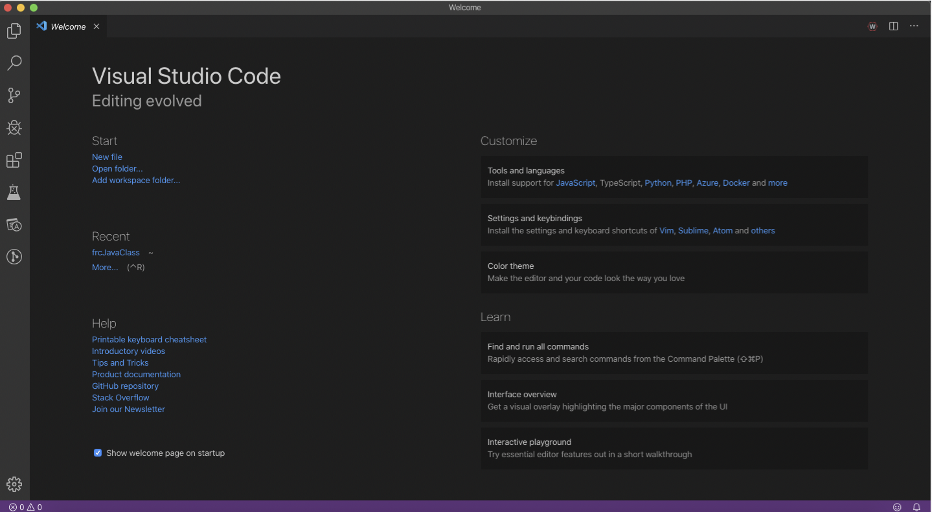
- In this exercise, we'll use an IDE to enter and execute a Java program. Start and the following window will appear:

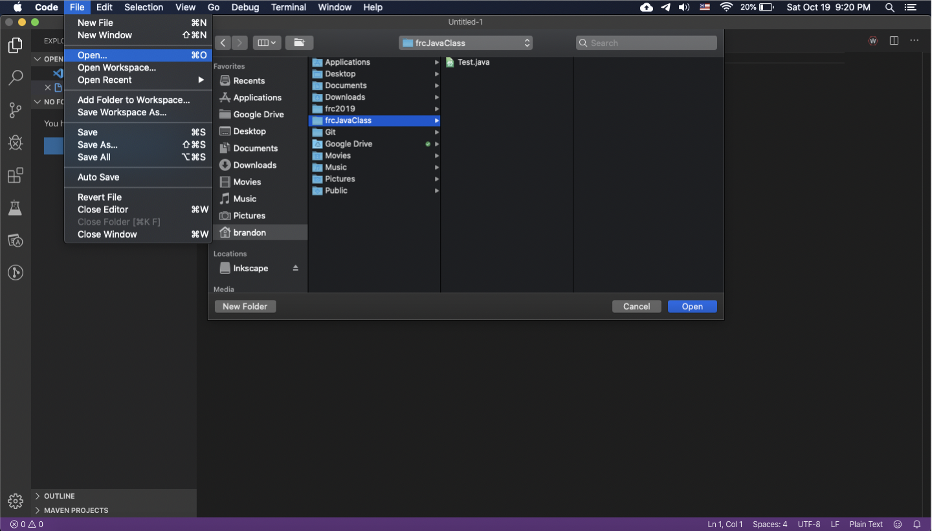
- Select the File > Open and either open a folder to use as the workspace or create a new one

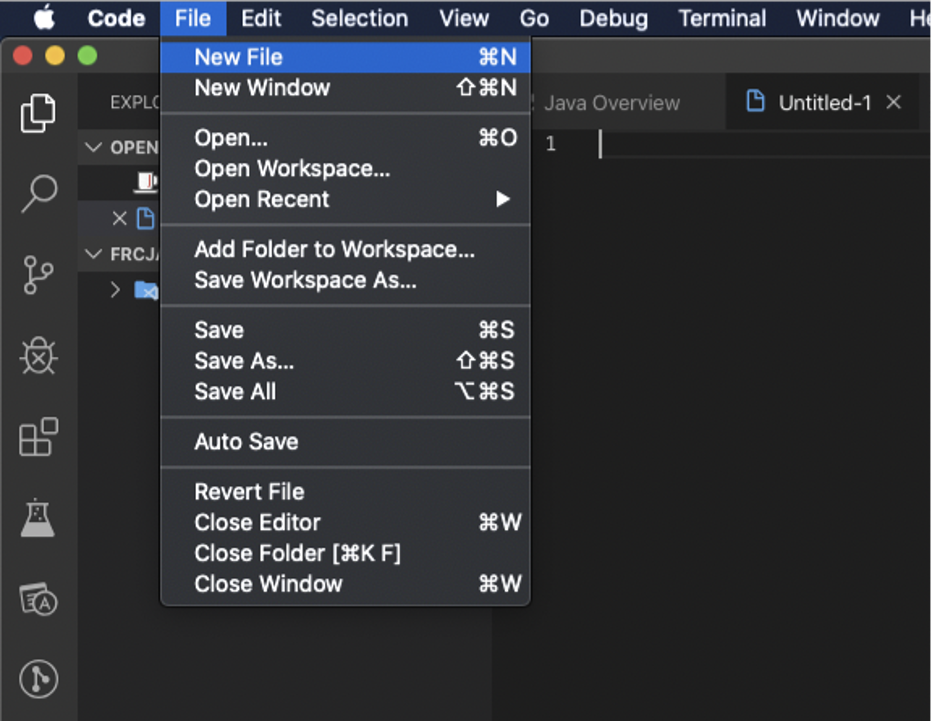
- Create a new file File > New File

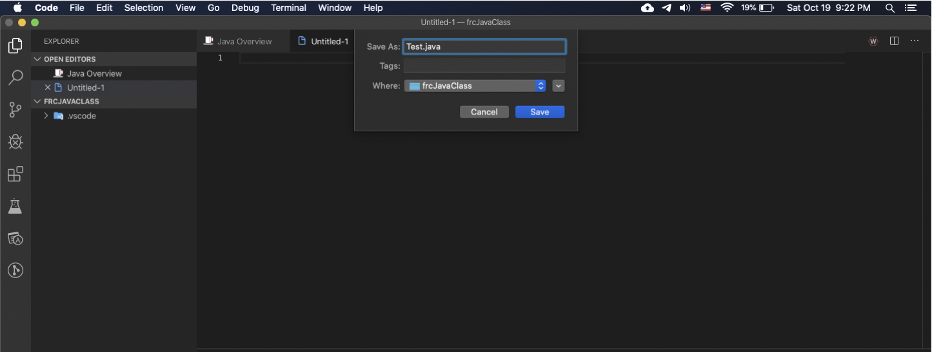
- Save the file as Test.java

- Add the following code to start your program.
public class Test { } - Add these standard comment lines at the start of the Class (use your name and the current date), this goes above line 1:
/** * Print the Answer to Life, the Universe, Everything. * @author Enter your name * @version Enter today's date */ - Enter the following code starting inside your class.
public class Test { static int answer1 = 0; static int answer2; static int theAnswer; public static void main(String[] args) { answer1 = 20; answer2 = 2 * answer1; theAnswer = answer2 + 2; System.out.println("The answer is..."); System.out.println(theAnswer); } } - To run the program, press run above the main method. The output should be:
The answer is....42 - Create a new file named
ComputeCA. - Create a class in the file named the same as the file name. It always has to be the same. Your class and file name should ALWAYS start with a capital letter.
- Change the class description to
Computes the circumference and area of a circle. - Change the author and the version by entering your name and today's date, respectively.
- Enter the signature for the main method, this signature is:
public static void main(String[] args){ } - Declare a variable named
radiusof typedoublethat has a value of 4.5. - Declare another variable named
circumferenceof typedoublethat has the value of 2π × radius. Use 22.0/7.0 for the value of π. - Declare a third variable named
areaof typedoublethat has the value of π × radius2. To easily compute the radius2, multiply the radius by itself. - Display the value of the
circumference. - Display the value of the
area.Circumference: 28.285714285714285 Area: 63.64285714285714
Java API Documentation
If you have enough screen real estate, open your browser and visit http://java.oracle.com then follow the link to the API documentation. Having the API window always available speeds up the development process.
L02 - Soda Can Lab
In this exercise, we're going to implement a class SodaCan. This class has a constructor that accepts the height and radius of the soda can as parameters. We'll supply the methods getVolume and getSurfaceArea. We'll also write a SodaCanTest class to test our SodaCan class.
- Use a calculator to generate some test cases. We'll use these to check the program's results:
Case 1: r = 4 h = 10 Area = _____________ Volume = ______________ Case 2: r = 3.5 h = 7.2 Area = _____________ Volume = ______________ - Enter the program below that contains a skeleton of the
SodaCanclass. You must supply the code that fills in the blanks./** Constructor and methods for a soda can object @author __________ @version __________ */ public class SodaCan { __________ double r; //soda can radius __________ double h; //soda can height public SodaCan(double _____, double _____) { r = _____; h = _____; } public _______ findSurfaceArea() { return _____; //compute the surface area A=2πrh+2πr^2 } public double findVolume(){ return _____; //compute the volume V=πr^2h } } - Enter the program below that contains a skeleton of the
SodaCanTestclass. You must supply the code that fills in the blanks.import java.util.Scanner; /** _______________________________ @author __________ @version __________ */ public class ___________ { public static void main(String[] args) { Scanner myScanner = new Scanner(System.in); System.out.print("Enter the radius: "); String answer = myScanner.nextLine(); double radius = ______; //convert using the parseDouble method System.out.print("Enter the height: "); answer = myScanner.nextLine(); double height = ______; //convert using the parseDouble method //instantiate a soda can object using the radius and height above //display the surface area to three decimal digits using printf //display the volume to three decimal digits using printf } } - Use your test cases to check your code.
L03 - Coupons
A supermarket awards coupons depending on how much a customer spends on groceries. For example, if you spend $50, you will get a coupon worth eight percent of that amount. The following table shows the percent used to calculate the coupon awarded for different amounts spent. Write a program that calculates and prints the value of the coupon a person can receive based on groceries purchased. Use printf to print formatted output.
Hint: Because the % symbol flags the beginning of a format specifier, if you want to actually print a % you'll need to enter it twice: %%
Here is a sample run:
| Money spent | Coupon Percentage |
|---|---|
| Less than $10 | No coupon |
| From $10 to $60 | 8% |
| More than $60 to $150 | 10% |
| More than $150 | 14% |
Sample Dialog
Please enter the cost of your groceries: 14
You win a discount coupon of $ 1.12. (8% of your purchase)
L04 - Iteration Lab - Part 1 - The Three Loops
Enter the following program and fill in the missing pieces so that the three different styles of loops compute the sum of numbers.
public class Loops {
  public static void main(String[] args) {
    //sum the numbers from 1 to 5 using a for loop
    int sum = __________;
    for(_________;_________;_________) {
      sum = sum + i;
    }
    System.out.println("The sum of the numbers from 1 to 5 is " + sum);

    //sum the numbers from 1 to 10 using a while loop
    sum = 0;
    int i = 0;
    while (__________) {
      i = __________;
      sum = sum + i;
    }
    System.out.println("The sum of the numbers from 1 to 10 is " + sum);

    //sum the numbers from 1 to 15 using a do...while loop
    sum = 0;
    i = 0;
    do {
      i = __________;
      sum = sum + i;
    } while (__________);
    System.out.println("The sum of the numbers from 1 to 15 is " + sum);
  }
}
You can check your results by using the formula 1 + 2 + ... + n = n(n+1)/2
Sample Output
The sum of the numbers from 1 to 5 is 15
The sum of the numbers from 1 to 10 is 55
The sum of the numbers from 1 to 15 is 120
L04 - Iteration Lab - Part 2 - Nested For Loops
We can determine if a number is even or odd by checking the remainder after dividing the number by 2:
if (number % 2 == 0)
  System.out.println(number + " is even");
else
  System.out.println(number + " is odd");
- Create a class named
Patternsthat uses this technique with two nested for loops to reproduce the pattern below. The outer for loop should control the row (0 through 7) and the inner for loop should control the column (0 through 7):
| 0 | 1 | 2 | 3 | 4 | 5 | 6 | 7 | |
|---|---|---|---|---|---|---|---|---|
| 0 | X | _ | X | _ | X | _ | X | _ |
| 1 | _ | X | _ | X | _ | X | _ | X |
| 2 | X | _ | X | _ | X | _ | X | _ |
| 3 | _ | X | _ | X | _ | X | _ | X |
| 4 | X | _ | X | _ | X | _ | X | _ |
| 5 | _ | X | _ | X | _ | X | _ | X |
| 6 | X | _ | X | _ | X | _ | X | _ |
| 7 | _ | X | _ | X | _ | X | _ | X |
L05 - Using Arrays
- Create a new class named
UsingArrays. - Using the lecture slides as a guide, declare and initialize an array of four integers that contains the values
3, 7, 13, and 18. - Using a for loop, display each of the four array values and the square of that value.
Sample Dialog
3 squared is 9
7 squared is 49
13 squared is 169
18 squared is 324
- Add a for loop and display each of the four array values. Also, if the value is less than 10, display the message
less than 10. If the value is greater than 10 but less than 15, displaygreater than 10 and less than 15. If the value is greater than 10, displaygreater than 15.
Sample Dialog
3 is less than 10
7 is less than 10
13 is greater than 10 and less than 15
18 is greater than 15
- Write a program called
ArrayTestthat will do the following actions (complete each action before moving on to the next one):- Create an array in the main method that contains the following integer values:
- 34
- 2
- 14
- 34
- 58
- 4
- Print out all of the array values using a for loop
- Find and print the array element with the maximum value
- Find and print the average value of the elements in the array
- Copy three elements from this array, starting at the second element, into a new array of size 3
- Create an array in the main method that contains the following integer values:
L06 - Bank Account Lab
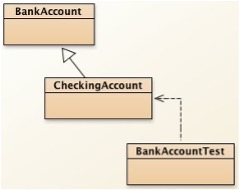
In this lab, we'll implement three classes: BankAccount, CheckingAccount, and BankAccountTest. As we write these classes, we will be taking advantage of Java's inheritance and polymorphism capabilities to make our job easier.
BankAccount Class
This is the parent class. The CheckingAccount will be derived from this class.
Member variables
double balance
Constructors
public BankAccount()
- creates a
BankAccountwith a zero balance
public BankAccount(double initialBalance)
- creates a BankAccount with a value of initial balance
Methods
public void deposit(double amount)
- increases the balance by amount
public void withdraw(double amount)
- decreases the balance by amount
public double getBalance()
- returns the current balance
BankAccount.java
Download this file from Drive, it’s in L06F.zip and fill in the blanks with the missing code.
/**
Parent BankAccount class
@author __________
@version __________
*/
public class BankAccount {
  __________ double balance;

  public BankAccount(){
    balance = 0;
  }

  public BankAccount(double initialBalance) {
    balance = __________;
  }

  public __________ deposit(double amount) {
    balance = __________ + amount;
  }


  public void withdraw(double amount) {
    balance = __________ - amount;
  }

  public double getBalance() {
    return __________;
  }
}
CheckingAccount Class
This class extends the BankAccount class.
Member variables
int transactionCount
- the number of transactions accumulated over a month
Constructors
public CheckingAccount()
- creates a checking account with a zero balance and sets transactionCount to zero.
public CheckingAccount(double initialBalance)
- creates a checking account and with a balance of initialBalance and sets transactionCount to zero.
Methods
public void deposit(double amount)
- increases the balance by amount and increases the transactionCount by 1.
public void withdraw(double amount)
- decreases the balance by amount and increases the transactionCount by 1.
public void deductFees()
- deducts the accumulated transaction fees and resets the transactionCount to 0. If there are more than three transactions, then the fee is equal to 2.00*(transactionCount – 3). Note that the first three transactions are free and that the fee per transaction is $2.00.
CheckingAccount.java
Download this file from Drive, it’s in L06F.zip and fill in the blanks with the missing code.
/**
Child CheckingAccount class
@author __________
@version __________
*/
public class CheckingAccount __________ BankAccount {
  __________ int transactionCount;

  public CheckingAccount() {
    transactionCount = 0;
  }

  public CheckingAccount(double initialBalance) {
    super(__________);
    //use the super class constructor that's already coded
    transactionCount = 0;
  }

  public __________ deposit(double amount) {
    super.deposit(amount);
    transactionCount = __________ + 1;
  }

  public void withdraw(double amount) {
    __________.withdraw(amount);
    transactionCount = __________ + 1;
  }

  public void deductFees() {
    if (transactionCount > 3) {
      double fee = 2.0*(transactionCount – 3);
      __________.withdraw(fee);
    }
    transactionCount = 0;
  }
}
Testing Our Classes
To test our two classes, we'll write a BankAccountTest class that performs the following:
- Instantiates a checking account with an initial balance specified by the user
- Presents a menu with the following options:
- D - Deposit money into the checking account (prompt the user for amount)
- W - Withdraw money from the checking account (prompt user for amount)
- P - Process end-of-month activities (withdraw fees for the checking account)
- S - Show the current checking account balance
- E - Exit the program
BankAccountTest.java
Download this file from Drive, it’s in L06F.zip and fill in the blanks with the missing code.
import java.util.*;
/**
BankAccount test class
@author __________
@version __________
*/
public class BankAccountTest {
  public static void main(String[] args) {
    Scanner myScanner = new Scanner(System.in);
    System.out.print("Enter initial checking account balance: ");
    double amount = Double.parseDouble(myScanner.nextLine());
    CheckingAccount myChecking = new CheckingAccount(amount);

    System.out.println("D - Deposit into checking");
    System.out.println("W - Withdraw from checking");
    System.out.println("P - End of month processing");
    System.out.println("S - Show account balance");
    System.out.println("E - Exit the program");

    boolean done = false;

    while (!done) {
      System.out.print("> ");
      String choice = myScanner.nextLine();

      if (choice.equalsIgnoreCase("D")) {
        System.out.print("Enter amount to deposit: ");
        amount = Double.parseDouble(myScanner.nextLine());
        myChecking.deposit(amount);
      }
      else if (choice.equalsIgnoreCase("W")) {
        System.out.print("Enter amount to withdraw: ");
        amount = Double.parseDouble(myScanner.nextLine());
        myChecking.withdraw(amount);
      }
      else if (choice.equalsIgnoreCase("P"))
        myChecking.deductFees();
      else if (choice.equalsIgnoreCase("S"))
        System.out.println("Checking balance: " + myChecking.getBalance());
      else if (choice.equalsIgnoreCase("E"))
        done = true;
      else
        System.out.println("Invalid menu choice - please re-enter");
    }

    System.out.println("Goodbye!");
  }
}
L07 - Shapes Lab
In this lab, we'll work with Abstract Classes.
- Start VS Code.
- During the lecture we discussed the following classes:
Shape– an abstract classCircle– a class that is derived from ShapeEllipse– a class that is also derived from Shape
- Using the
Circleclass a guide and the Ellipse slide, finish writing theEllipseclass - Using the
Circleclass as a guide, write a class calledRectangle:- extend the
Shapeclass - define member variables of type
doublefor thewidthandheight - create one or more constructors, as appropriate
- override the
equals,toString,findArea, andfindPerimetermethods
- extend the
- Create a new class with the name
ShapeTest. - This is the body of the class
ShapeTest:
public class ShapeTest {
    public static void main(String[] args) {
        Shape[] myShapes = new Shape[10];
        Circle myCircle = new Circle(10.0);
        double expected = 314.16;
        System.out.println("Circle Area: " + myCircle.findArea());

        myShapes[0] = new Circle(10.0);
        expected = 314.16;
        System.out.println("Circle in Shapes Array Area: " + myShapes[0].findArea());

        myShapes[1] = new Ellipse(5.0, 10.0);
        expected = 157.08;
        System.out.println("Ellipse in Shapes Array Area: " + myShapes[1].findArea());

        myShapes[2] = new Rectangle(5.0, 10.0);
        expected = 50.0;
        System.out.println("Rectangle in Shapes Array Area: " + myShapes[2].findArea());
    }
}
When you run the tests, notice that Java knows what particular kind of object (Circle, Rectangle, or Ellipse) has been stored in the array of Shapes.
L08 - Autopilot Interface Lab
In this lab, there is no main method, we are not running the code, just checking if it compiles without errors. To do that just make sure there are no errors.
- Fred Finn, ace programmer, has created an interface to ensure programmers who implement airplanes include the essential functions of an autopilot. Enter his code as shown below into a new Interface (not Class!!) named
Autopilot:
public interface Autopilot {
  final double MAX_AIRSPEED = 550;
  double airspeed = 0;
  double altitude = 0;
  double heading = 0;
  public void setAirspeed(double inAirspeed);
  public void setAltitude(double inAltitude);
  public void setHeading(double inHeading);
}
- Make sure you've entered the code as shown and try to compile
Autopilot.java. Do you get any errors? Enter your answer on the attached lab answer sheet. - Sandy Smith has attempted to implement this interface in her design of an airplane. Her code is shown below. Enter this code into a class named
Airliner.
public class Airliner implements Autopilot {
  private double maxAltitude;

  public Airliner(double inMaxAltitude) {
    maxAltitude = inMaxAltitude;
  }

  public void setAirspeed(double inAirspeed) {
    airspeed = inAirspeed;
  }

  public void setAltitude(double inAltitude) {
    altitude = inAltitude;
  }
}
- Make sure you've entered the code as shown and try to compile
Airliner.java. Do you get any errors? (Hint: the answer is yes). Describe the errors you encounter on your answer sheet. - Describe the interface coding rule that Fred Finn violated on your answer sheet (Hint: he violated one rule three times).
- Fix the
Autopilotinterface code to correct Fred's error. - Now compile
Airliner.javaagain and see if you get any errors. - Fix the
Airlinercode to correct Sandy's error.
Lab Answer Sheet
- What errors did you get when compiling
Autopilot.java? - Describe the type of errors encountered when
Airliner.javawas compiled: - What interface coding rule did Fred Finn violate?
- Describe the error when
Airliner.javawas compiled:
L09 - ReverseIt Lab
Write a program that reads in a file and writes each line backwards to an output file. Below is a skeleton of the program. Fill in the blanks with the missing code.
/**
* Reverses each line of an input file and writes it to an output file.
*
* @author ______
* @version ______
*/
import java.util.*;
import java._____.*;
public class ReverseIt {
  public static void main(String[] args) throws _____, _____ {
    Scanner myScanner = new Scanner(System.in);
    System.out.print("Enter input filename: ");
    String inFilename = myScanner.nextLine();
    System.out.print("Enter output filename: ");
    String outFilename = myScanner.nextLine();
    FileReader inReader = new FileReader(______);
    PrintWriter outWriter = new PrintWriter(______);

    Scanner inputFile = new Scanner(______);
    while (inputFile.hasNext()) {
      String inString = ______.nextLine();
      String outString = "";
      for (int i = 0; i < ______.length(); i++)
        outString = ______.charAt(i) + outString;
      outWriter.println(______);
    }
    ______.close();
    ______.close();
    System.out.println("Goodbye!");
  }
}
Sample Dialog
Enter input filename: ReverseIt.java
Enter output filename: sdrawkcaB.txt
Goodbye!
L10 - Runtime Exceptions Lab
Runtime Exceptions Lab Using the lecture slides as a guide,
- In a new class, instantiate an array that can hold exactly four integers
- Using a for loop, prompt the user for an integer and store the value in the array. Repeat this five times (!).
- Run your program and note the error.
- Use a try/catch block to handle the particular runtime exception that occurred.
Sample Dialog for Improved Version
Enter a number: 1
Enter a number: 2
Enter a number: 3
Enter a number: 4
Enter a number: 5
No more room!!
Your numbers are: 1 2 3 4 Goodbye!
L11 - Designing Exception Types Lab
In this lab, we'll create our own exception class for the BankAccount class to handle the case where a customer tries to withdraw more money than they have in their account.
- If you haven't already done so, complete the L06 Bank Account lab.
- Create an
InsufficientFundsexception class that consists of the following statements:
public class InsufficientFunds extends RuntimeException {
  public InsufficientFunds() { }
  public InsufficientFunds(String msg) {
    super(msg); //use superclass RuntimeException constructor
  }
}
- Modify the withdraw method in the
BankAccountclass to compare the amount to the balance and throw anInsufficientFundsexception if there isn't enough money:
public void withdraw(double amount) {
  if (amount <= balance) balance -= amount;
  else {
    InsufficientFunds myEx;

    myEx = new InsufficientFunds("Amount exceeds balance");
    throw myEx;
  }
}
- Modify the
BankAccountTestprogram so that it handles anInsufficientFundsexception:
...
else if (menuChoice.equalsIgnoreCase("W")) {

  try {
    System.out.print("Enter amount: ");
    String answer = myScanner.nextLine();
    amount = Double.parseDouble(answer);
    myChecking.withdraw(amount);
  }
  catch (InsufficientFunds myEx) {
    System.out.println(myEx.getMessage());
    System.out.println("Transaction aborted!");
  }
} ...
- Execute the
BankAccountTestprogram using values that does not and does trigger the withdraw exception.
Sample Dialog
Enter initial checking account balance: 500
D - Deposit into checking
W - Withdraw from checking
P - End of month processing
S - Show account balance
E - Exit the program
>W
Enter amount: 100
>S
Checking balance: 400.0
>W
Enter amount: 1000
Amount exceeds balance Transaction aborted!
>e
Goodbye!
L12 - Recursion Exercise
Part A – Fibonacci
A recursive algorithm can be very fast. Sometimes it's the only solution to a problem. Sometimes the recursive version of an algorithm has very poor performance compared to an iterative solution. In this part of the exercise, we'll empirically determine the performance of a recursive Fibonacci algorithm by measuring the elapsed time required to run the algorithm for a series of values. Fill in the missing code in the fibonacci method in the FibonacciTest class:
import java.util.*;
public class FibonacciTest {
  public static void main(String[] args) {
    Scanner myScanner = new Scanner(System.in);
    boolean done = false;
    while (!done) {
      System.out.print("Enter an integer or Q to quit: ");
      String answer = myScanner.nextLine();
      if (answer.equalsIgnoreCase("q")) done = true;
      else {
        int myLong = Integer.parseInt(answer);
        long startTime = System.currentTimeMillis();
        long fibN = fibonacci(myLong);
        long endTime = System.currentTimeMillis();
        double elapsedTime = (endTime - startTime)/1000.0;
        System.out.print("Fibonacci(" + myLong + ") = " + fibN);
        System.out.println(" took " + elapsedTime + " seconds");
      }
    }
    System.out.println("Goodbye!");
  }

  public static long fibonacci(long n) {
    if (n <= 2)
      //enter the code for the base case here
    else
      //enter the code for the recursive case here
  }
}
Test your program using the following values and record your results:
fibonacci(10) = _________ and took _________ seconds
fibonacci(20) = _________ and took _________ seconds
fibonacci(30) = _________ and took _________ seconds
fibonacci(40) = _________ and took _________ seconds
fibonacci(50) = _________ and took _________ seconds
What do you notice about the time it takes to find the solution?
Part B – Computing an
Write a program that uses a recursive algorithm to compute the value of an where a is any number and n is an integer ≥ 0. Prompt the user for values of a and n and display the result. Recall that an is the same as aaa*a...*a (n times)
- As you develop your algorithm, what is the base case?
What is the recursive case?
Part C – Reverse a String
Write a program that uses a recursive algorithm to print a string in reverse. For example, if the user entered "abcdefg" then the program would display "gfedcba". Some String class methods that might be useful are length, substring, and charAt. Prompt the user for a string and display the result.
- What is the base case?
- What is the recursive case?
L13 - Finite State Machines
Introduction – Making Change
Finite State Machines(FSMs) are a method to organize a system of inputs and outputs into a program that is easy to write, understand, and extend. For example, let's imagine you are writing code for a vending machine to output the correct amount of coins to dispense given the amount of change needed to dispense.
By this point in the programming labs, you should be pretty familiar with Java. To put this state machine together, we are going to need to know how to use switch statements, and create enums.
The easiest way to create a finite state machine is to create A diagram. If you just start programming without planning first you are going to rapidly create bugs in the system.
Let's try to describe the environment and goals that we need to achieve with our program.
Inputs
- The amount of change we need to dispense which is an Integer between 0 and 99.
Output
- The number of Quarters, Dimes, Nickels, and Pennies that the machine needs to dispense.
So far writing this program is business as usual, next we are going to use a diagram to show us what states and transitions the FSM needs. These are essentially the way that the program will use the inputs to figure out the outputs.
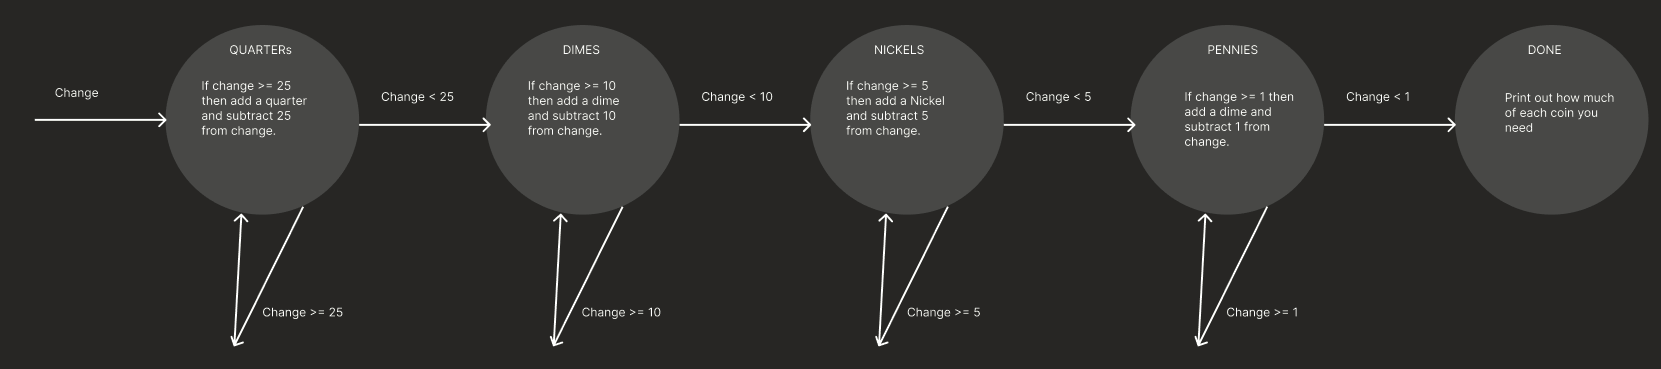
This diagram represents everything you need to know about the state machine to implement it. A state machine is made us of several states that represent what the program is doing at a given moment. In this program, we have 5 possible states represented by the large circles. We have Quarters, Dimes, Nickels, Pennies, and Done. You don't always need a done state, but here it makes it convenient to print out at the end. The arrows represent the flow of the program. We start with the QUARTERS state. Inside that circle, you can see what we need to do while in the QUARTERS state. We stay in the QUARTERS state as long as the remaining change we need to make is above 25.
Once the change is below 25 we Transition to the Dimes state, And we continue in this process until we are in the finished state.
That's enough background, its time for code.
PART A
First we need to set up the states. We represent the states as Enums to make it as readable as possible. Fill in the blanks below in a new Java Project
enum STATES {
    _____,
    ____,
    _____,
    _____
        }
Next we need to make the object that will store all the different kinds of change we are using.
class Change {
    int pennies;
    int nickels;
    int dimes;
    int quarters;

    public Change(){
        pennies = 0;
        nickels = 0;
        dimes = 0;
        quarters = 0;
    }

    public void addPenny(){
        pennies++;
    }

    public void addNickel(){
        nickels++;
    }
    public void addDime(){
        dimes++;
    }
    public void addQuarter(){
        quarters++;
    }

    @Override
    public String toString() {
        return "Change{" +
                "pennies=" + pennies +
                ", nickels=" + nickels +
                ", dimes=" + dimes +
                ", quarters=" + quarters +
                '}';
    }
}
that's the boilerplate out of the way and now we can work on the actual state machine.
public class Main {
    public static void main(String[] args) {

        makeChange(25);


    }

    public static Change makeChange(Integer changeToMake) {
        STATES state = STATES.QUARTERS;
        Change change = new Change();
        while (changeToMake > 0) {
            switch (state) {
                case ____:
                    if (changeToMake >= ____) {
                        change.____();
                        changeToMake -= ____;
                        state = STATES.____; // this isn't needed but it makes it clear we intent to stay in the state.
                    }
                    if (changeToMake < ____) {
                        state = STATES.____;
                    }

                    break;
                case ____:
                    if (changeToMake >= ____) {
                        change.addDime();
                        changeToMake -= ____;
                        state = STATES.____; // this isn't needed but it makes it clear we intent to stay in the state.
                    }
                    if (changeToMake < 10) {
                        state = STATES.____;
                    }

                    break;
                case ____:
                    if (changeToMake >= ____) {
                        change.____();
                        changeToMake -= ____;
                        state = STATES.____; // this isn't needed wbut it makes it clear we intent to stay in the state.
                    }
                    if (changeToMake < ____) {
                        state = STATES.____;
                    }
                    break;
                case ____:
                    if (changeToMake >= ____) {
                        change.____();
                        changeToMake -= ____;
                        state = STATES.____; // this isn't needed but it makes it clear we intent to stay in the state.
                    }

                    break;
            }
        }

        System.out.println(change.toString());
        return change;
    }


}
After you've filled in those blanks with the proper states and values from the diagram you can work on extending the state machine
PART B
implement the same state machine but add single dollar bills to it, and make the diagram too.